Every website needs a navigation bar. It helps visitors move around your site with ease. In WordPress, the navigation bar usually sits at the top of the page, in the header. If you don’t see one yet, don’t worry. Adding it is simple. Let’s walk through the steps.
What Is a Navigation Bar?
A navigation bar is the menu you see at the top of most websites. It often features links such as Home, About, Blog, Shop, and Contact. The purpose is to guide visitors to important sections of your site.
In WordPress, the navigation bar is also referred to as a “menu.”
Step 1: Go to the Menu Settings
- Log in to your WordPress dashboard.
- On the left side, click Appearance > Menus.
- If you don’t have a menu yet, click Create a New Menu.
Here you can start building your navigation bar.
Step 2: Add Links to the Menu
- On the left side, you’ll see pages, posts, custom links, and categories.
- Tick the box for the pages you want to add, like Home or Contact.
- Click Add to Menu.
- Drag and drop the items to reorder them.
This will shape the menu structure for your header.
Step 3: Assign the Menu to the Header
Adding items to the menu is not enough. You must place it in the right spot.
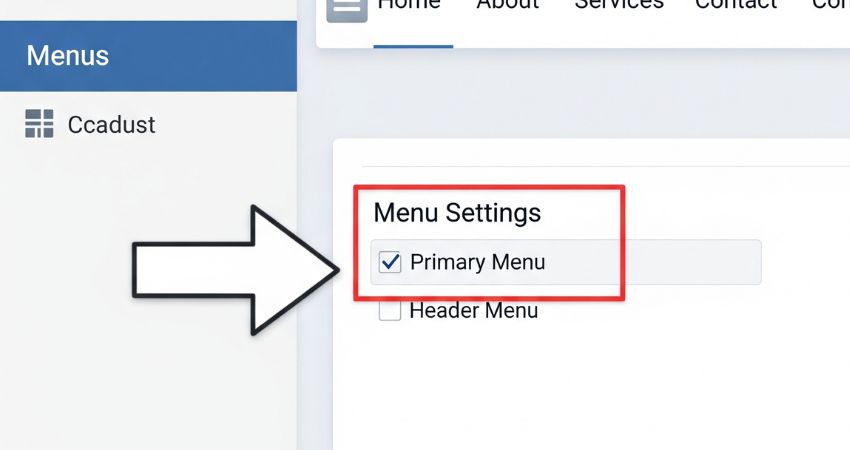
- Scroll down to Menu Settings.
- Look for Display Location.
- Tick Primary Menu (or Header Menu, depending on your theme).
- Save the menu.
Now your navigation bar will appear in the header.
Step 4: Style the Navigation Bar (Optional)
Many themes allow you to style your menu.
- Go to Appearance > Customize.
- Click on Menus and select your menu.
- Adjust the font size, colors, and alignment if your theme supports these options.
If you use a page builder like Elementor, you can add more design options.
Step 5: Add Dropdowns (Optional)
If you want sub-menus:
- Drag a menu item slightly to the right under another item.
- This makes it a dropdown.
- Save the menu.
For example, under “Shop,” you can add “Men’s Clothing” and “Women’s Clothing.”
Using Plugins for More Control
Some plugins give your navigation bar more power. Popular ones include:
- Max Mega Menu – for advanced dropdowns and mega menus.
- WP Mobile Menu – for mobile-friendly navigation.
- Elementor Nav Menu Widget – for custom designs.
Add Custom CSS for Extra Styling
If you want more control, you can add CSS in Appearance > Customize > Additional CSS. Here’s a simple snippet:
/* Style the navigation bar background */
.main-navigation {
background-color: #222;
padding: 10px;
}
/* Style the links */
.main-navigation a {
color: #fff;
padding: 10px 15px;
text-decoration: none;
font-weight: bold;
}
/* Change link color on hover */
.main-navigation a:hover {
background-color: #444;
color: #ffcc00;
}
/* Align menu items horizontally */
.main-navigation ul {
list-style: none;
margin: 0;
padding: 0;
display: flex;
gap: 20px;
}
This will give your navigation bar a clean, dark background, bold white links, and a hover effect with yellow text.
Best Practices for Navigation Bars
- Please keep it simple. 5–7 items are enough.
- Put the most important links first.
- Use clear names like “Blog” instead of “Articles.”
- Check how it looks on mobile.
FAQs
Q: Why is my navigation bar not showing in the header?
Because it’s not assigned to the primary menu spot in your theme.
Q: Can I add custom links in the menu?
Yes. Use the “Custom Links” option in the menu editor.
Q: How do I change the color of the navigation bar?
Go to Appearance > Customize > Additional CSS and use a snippet like the one above.
Q: Can I add icons to the navigation bar?
Yes. Some themes and plugins allow icons to be displayed next to menu items.
Final Thoughts
Adding a navigation bar to the header in WordPress is a straightforward process. Create a menu, add links, and assign it to the header. Once it shows up, you can style it or expand it with dropdowns. Adding a bit of custom CSS can also give your site a unique look. A clear navigation bar makes your website easier to use and more professional.